http://tuxgraphics.org/electronics

Tuxgraphics soldering Howto
![[Illustration]](../../common/images2/article09032/solderstation.jpg)
Abstract:
Soldering is great fun. This is an introduction for people with
no or little experience.
_________________ _________________ _________________
|
The basic idea
The most imprtant thing to remember when soldering is that you don't actually
melt the solder-wire with the soldering iron. I found that this was surprising
to many people new to this area. However once they had understood this it is
just a bit of training that is required to become an expert.
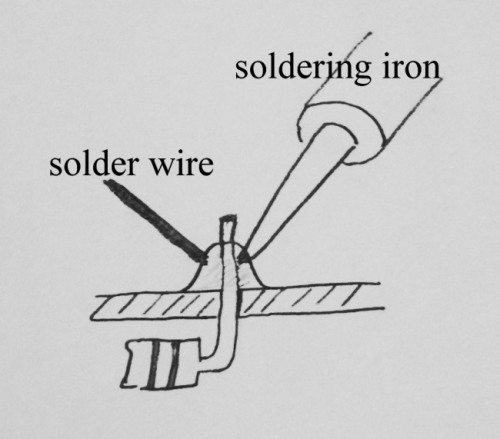
So, if you don't melt the solder wire with iron what do you do?? Take a look at
the pictures below.
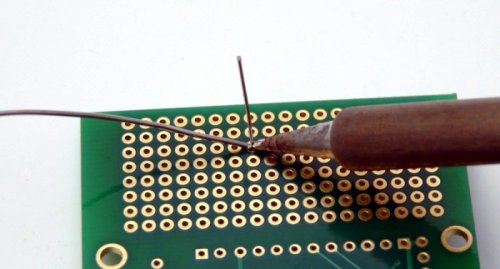
With one hand you hold the soldering iron and with the other hand the solder
wire. You place the board onto the table. It does not matter which hand is
holding the wire and which hand the iron. Hold the iron against the board and the
component wire. About half a second later you come from
the opposite side and you hold the solder wire against the now hot component
wire. The solder will melt because the component and the pad on the board are
hot. It will flow around and fill the gap between wire and board:
If I don't melt the solderwire directly with the iron why keep it clean?
Once in a while you should clean the solder iron tip with a heat resistent wet
sponge. Once it is nice and shiny you tin it with a little bit of solder.
Why is
that?
When you solder a component to the board then eventually the liquid solder will
flow around the component wire and get also to the tip of the soldering iron. A
dirty tip would not "attract" the solder and it would stay away. There is
however a more important point. Heat transfer from the solder iron tip to the
component and the pad on the board. If there is a bit a of solder on the tip of
the soldering iron
then this will result in a much better thermal contact.
What kind of solderwire to use?
 I recommend thin, 0.7mm to 0.3mm, lead free solder wire. Lead-free solder wire
is more expensive but it has advantages from an environment/health point of
view. If you use both lead free and solder with lead then you will notice
that solder with lead tends to flow easier. However with a bit of training and
soldering station where you can turn up the heat you will soon find that
lead free is just as easy to use.
I recommend thin, 0.7mm to 0.3mm, lead free solder wire. Lead-free solder wire
is more expensive but it has advantages from an environment/health point of
view. If you use both lead free and solder with lead then you will notice
that solder with lead tends to flow easier. However with a bit of training and
soldering station where you can turn up the heat you will soon find that
lead free is just as easy to use.
A good solder iron temperature for lead free solder wire is around 300'C (570'F).
Health considerations
When you buy a soldering iron in California then you will find the following
printed on the box:
Warning: This product, when used for soldering and similar
applications, produces chemicals known to the State of California to
cause cancer and birth defects or other reproductive harm.
 People who are not from California might be shocked by those lines but you
should also know that all products that contain certain classified chemical get
this printout. You find a similar sentence on original Italian Balsamico Vinegar if
you buy it in California. That does of course not mean that one should take
it lightly.
It is there for a good reason.
People who are not from California might be shocked by those lines but you
should also know that all products that contain certain classified chemical get
this printout. You find a similar sentence on original Italian Balsamico Vinegar if
you buy it in California. That does of course not mean that one should take
it lightly.
It is there for a good reason.
Why this warning? There are two main substances here that can cause probems.
One is the lead in the solder. You can eliminate it by using lead free
solder wire. The other substance is the resin or solder flux which is
inside the wire. This flux is needed to protect the solder from oxygen.
The flux will flow on top of the liquid solder and thus prevent oxygen in
the air from causing a chemical reaction with the liquid metal. This solderflux
will also evaporate a bit causing the often visible fumes.
In general you will have your face close and slightly above
the point where you solder. This is because you would want to see what you solder.
This means unfortunately also that most of the fumes will go straight into your
nose.
What to do? Most solderflux will just evaporate a bit when heated and become
again solid when it cooles down. It forms fine particles in the air. Simple
dust masks offer here a good protection.
One can also buy fans with a filter that suck some of the fumes away but I prefer
a simple mask and from time to time ventilation of the room with fresh air.
Removing components with two to three pins
 To remove a component is often more difficult than to solder on
in the first place.
To remove a component is often more difficult than to solder on
in the first place.
A through-hole component with 2 wires (e.g a resistor) can be removed by putting
the circuit board up-right into 3rd-hand tool and then pulling one side of the
component with your hand or some pliers while heating the solder on the board
with the soldering iron. Usually you can pull just a little bit and then you
have to work on the other end of the component to get it out. You might have to
go back and forth between the ends of the component to remove it step by step.
A 3rd-hand tool is also known as helping hand (see
picture on the right).
Once the component is out the holes are usually closed and it would be
difficult to insert a new component.
The usual method to suck the liquid solder out of the holes is to use a solderpump
as show below. You can also try it with solderwick (the copper wire mesh in the
spool shown below).

A problem of the solderpumps is that they can push back quite a bit and that can
damage the board. If they are push back free then they usually don't suck well.
A different less known trick is to get some 0.6mm injection needle
from the pharmacy. Those needles are made from stain less steel and solder does
not want to stick to it.

First you take a file and make the tip of the needle nice and round. Don't try
to use a sharp needle. It is dangerous.
The component is out of the hole but the hole and the pad are full of solder
now we want to open the hole again to be able to insert later a new component.
Heat the solder with the iron and then push with the other hand the needle
throug the hole from the other side while the solder is liquid. Remove the iron
and let the solder cool down. The solder does not stick to the injection needle.
It is almost like water and oil. Once the solder is cold you can pull out the
needle and you have a hole.
Removing components with many pins
This is almost impossible with a normal soldering iron. I always recommend to
avoid to do any damage to the board. If you damage a component then that is
not a big problem. You can replace it. If you damage the board then you might
have to replace everything. Therefore be always gentle to the printed circuit
board.
Components with many pins, like ICs, can be removed with hot air but that
is difficult too especially if there are other components around.
The best solution is to just forget the component which you want to remove
and cut with a cutter every pin. After that you heat pin by pin with the
soldering iron and pull each pin individually out. Tweezers become here
very handy.
Soldering SMD components
To have a soldering iron with a very fine tip is very important for SMD
soldering. I use also fine
0.3mm solder wire. To solder
components with 2 pins you heat one pad and put a bit of solder on it.
Remove the soldering iron from the pad.
Hold the component with tweezers in the right position onto the pad.
Now heat the pad with the soldering iron and the surface tension of the liquid
solder will almost suck the component onto the board. Now go to the other end
of the compoent and melt a bit of solderwire in the corner between pad and
component. Capillary attraction will cause the solder to flow on the pad
right under the component.
ICs are soldered almost the same way. Just position the component right and then
solder pin by pin to the printed circuit board.
ICs in MELF package (Metal Electrode Leadless Face) are almost impossible to
handle with a normal soldering iron if they have more than 2 pins.
Common MELF IC are e.g 5x5mm in size and have possibly 32pins all hidden under the
package.
Removing SMD components
To remove SMD components is very difficult with a normal soldering iron. A mini
hot air tool is the best solution to remove SMD components. Two
pin components can also be removed by using two soldering irons at the same time.
© Guido Socher, tuxgraphics.org
2009-03-23, generated by tuxgrparser version 2.56
 I recommend thin, 0.7mm to 0.3mm, lead free solder wire. Lead-free solder wire
is more expensive but it has advantages from an environment/health point of
view. If you use both lead free and solder with lead then you will notice
that solder with lead tends to flow easier. However with a bit of training and
soldering station where you can turn up the heat you will soon find that
lead free is just as easy to use.
I recommend thin, 0.7mm to 0.3mm, lead free solder wire. Lead-free solder wire
is more expensive but it has advantages from an environment/health point of
view. If you use both lead free and solder with lead then you will notice
that solder with lead tends to flow easier. However with a bit of training and
soldering station where you can turn up the heat you will soon find that
lead free is just as easy to use.
 People who are not from California might be shocked by those lines but you
should also know that all products that contain certain classified chemical get
this printout. You find a similar sentence on original Italian Balsamico Vinegar if
you buy it in California. That does of course not mean that one should take
it lightly.
It is there for a good reason.
People who are not from California might be shocked by those lines but you
should also know that all products that contain certain classified chemical get
this printout. You find a similar sentence on original Italian Balsamico Vinegar if
you buy it in California. That does of course not mean that one should take
it lightly.
It is there for a good reason.